
Last reviewed: May 29, 2026
Meta Advantage+ placements can help ecommerce video ads reach more inventory, but they do not solve the hardest creative problem: one product video rarely fits every placement. A 9:16 UGC clip may feel native in Reels and Stories, get cropped awkwardly in feed, and provide weak intent signals in low-quality placements if the campaign is optimized only for cheap clicks.
This guide explains how ecommerce teams should prepare video ads for Meta Advantage+ placements, when to keep the automation on, when to use manual controls, and how to read placement performance without turning the campaign into a guess.
Quick Answer
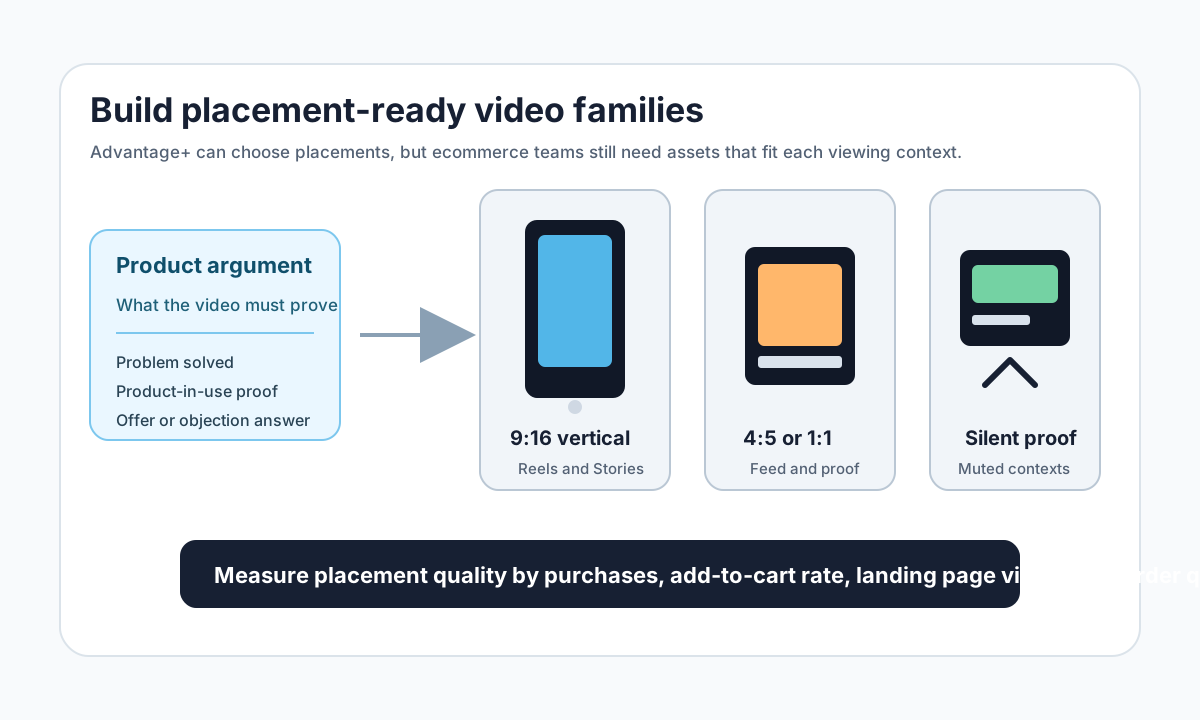
Use Meta Advantage+ placements when you have enough clean conversion signals, multiple creative formats, and a product offer that can work across Facebook, Instagram, Messenger, Reels, Stories, feed, and related Meta inventory. Do not treat it as a single-video shortcut. For ecommerce video ads, prepare at least three asset families: a 9:16 vertical version for Reels and Stories, a 4:5 or 1:1 version for feed, and a silent-friendly product proof cut for placements where the viewer may not watch with sound.
The safest workflow is:
- Launch with Advantage+ placements when the campaign objective is purchase, add-to-cart, or qualified landing page action.
- Upload placement-ready video variants instead of forcing one crop everywhere.
- Keep the product, offer, headline, proof moment, and CTA inside the visual safe zone.
- Review performance by placement, platform, device, and post-click quality.
- Restrict placements only when the data shows poor conversion quality, brand-safety risk, or repeated creative mismatch.
If you are still deciding which video examples to make first, start with product video examples for ecommerce, then use creative ads examples for ecommerce video testing to build a test matrix before scaling.
Source Context Checked for 2026
Meta's public Advantage+ Shopping page describes automated delivery across Meta platforms, including Facebook and Instagram, with some placement controls available at the account level. Meta's Reels ads page emphasizes vertical video, quality audio, and keeping key messages inside the safe zone. Instagram's Help Center says reels can use aspect ratios from 1.91:1 to 9:16, with a minimum frame rate of 30 FPS and minimum resolution of 720 pixels. Meta Ads Guide pages for video placements remain the source to confirm final placement specs before upload.
Current SERP results for this topic are dominated by agency explainers, 2026 ad-size guides, and advertiser discussions about whether Audience Network, feed, Reels, and Stories deliver the same conversion quality. The gap is that most pages either praise automation or complain about low-quality placements. Ecommerce teams need a creative and measurement workflow: what to upload, what to measure, and when to override the automation.
What Advantage+ Placements Actually Decides
Advantage+ placements is the placement automation layer in Meta Ads. Instead of manually choosing every surface where an ad can appear, you let Meta choose delivery opportunities across eligible placements based on the objective, budget, audience, creative, and predicted result. In practice, that may include Facebook feed, Instagram feed, Reels, Stories, video surfaces, Messenger, Marketplace, Audience Network, and other eligible inventory depending on the campaign setup.
For ecommerce advertisers, this sounds efficient because the system can search for cheaper purchase opportunities across more auctions. The problem is that "eligible" does not always mean "creative-ready." A product video that is readable in a square feed card may fail in a vertical Reels environment. A fast UGC hook that works in Stories may lose product clarity when cropped into feed. A silent product demo may be fine for retargeting but too weak for cold Reels discovery.
The decision is not simply Advantage+ placements versus manual placements. The better question is:
Can the creative asset library support the placements the system is allowed to buy?
If yes, Advantage+ placements often deserves a test. If no, manual placements may protect budget while the team builds enough creative coverage.
Placement Fit Matrix for Ecommerce Video Ads
Use this matrix before launch. It maps common Meta placement environments to the ecommerce video assets that usually fit them.
| Placement environment | Best video format | Creative job | What must stay visible | Common failure |
|---|---|---|---|---|
| Instagram Reels and Facebook Reels | 9:16 vertical | Earn attention with product motion | Product, hook text, face or hand action, CTA cue | Text hidden by UI or product too small |
| Instagram Stories and Facebook Stories | 9:16 vertical | Direct response with urgency | Offer, product, next step, safe-zone text | Overloaded captions near top or bottom |
| Facebook and Instagram feed | 4:5 or 1:1 | Explain value while scrolling | Product, benefit, proof, readable headline | Reusing a tall Reels crop that cuts off context |
| Video feed or in-stream | 16:9, 1:1, or adapted video | Hold attention before or during video content | Product setup, result, brand cue | Slow opening that feels like a TV spot |
| Marketplace or shopping-adjacent surfaces | 1:1 or 4:5 | Show product and price logic clearly | Product, variant, offer, trust cue | Lifestyle-only video with weak product detail |
| Audience Network | Placement-dependent | Extend delivery only if quality holds | Clear product and brand identification | Cheap clicks with weak session quality |
| Retargeting placements | 1:1, 4:5, or 9:16 depending on inventory | Remove purchase hesitation | Objection answer, product proof, assurance | Repeating the same cold hook to warm buyers |
The practical implication is simple: do not upload one 9:16 video and assume Advantage+ placements will make it work everywhere. Create a small family of videos from the same core message.
The Three-Asset Starter Set
Most ecommerce teams can start with three cuts per product or offer. This gives Meta enough creative flexibility without turning production into a full agency project.
1. Vertical Discovery Cut
This is the 9:16 version for Reels and Stories. The opening should show the product in motion or the problem being solved in the first three seconds. Keep text overlays short and centered enough to avoid UI conflict. The script should work with sound, but the video should still make sense with captions.
Use it for:
- UGC-style hooks.
- Product-in-use demos.
- Founder or creator explanations.
- Offer-led Stories ads.
- Fast comparison videos.
The best vertical cut feels native to mobile consumption. It should not look like a landscape PDP video squeezed into a phone frame.
2. Feed Explanation Cut
This is the 4:5 or 1:1 version for feed-style placements. It can move slightly slower because feed viewers often have more visual context: headline, primary text, comments, and the brand account frame. The value proposition should be readable without relying on tiny subtitles.
Use it for:
- Feature proof.
- Before-after or side-by-side comparison.
- Product bundle explanation.
- Review-style proof.
- Retargeting objections.
If you only adapt the vertical cut by cropping, check whether hands, product labels, faces, and captions remain visible. Feed video often fails because the product argument is technically present but visually too small.
3. Silent Product Proof Cut
This version is built for muted autoplay and lower-attention placements. It can be 1:1, 4:5, or vertical depending on the campaign. The key is that the viewer can understand the product without voiceover.
Use it for:
- PDP retargeting.
- Shopping-adjacent surfaces.
- Offer reminders.
- Feature demonstrations.
- Catalog-style creative tests.
The silent proof cut should use visual labels, close-ups, and a clear end frame. It is not the most entertaining version, but it often protects conversion quality when the campaign expands beyond high-attention placements.
When to Keep Advantage+ Placements On
Advantage+ placements is most useful when the system has enough room to find buyers and enough creative to avoid awkward delivery. For ecommerce brands, it is usually worth testing when these conditions are true:
| Condition | Why it matters | Evidence to check |
|---|---|---|
| Clean conversion tracking | Automation optimizes toward the signal you give it | Pixel and Conversions API events match store orders closely enough |
| Purchase or strong intent objective | Cheap reach is not the same as buyer quality | Purchases, add-to-cart, initiate checkout, qualified landing page views |
| Multiple aspect ratios uploaded | The algorithm can match creative to placement | 9:16, 4:5 or 1:1, and silent-friendly variants exist |
| Broad enough audience | Placement automation needs auction flexibility | Audience is not overly narrow or exhausted |
| Product proof is visible | Cross-placement delivery still needs clarity | Product appears in first seconds and final frame |
| Budget can survive learning | Early placement mix may be noisy | Test budget covers enough conversions to judge quality |
If these conditions are present, start with Advantage+ placements and review the placement breakdown after the campaign has meaningful data. Turning off placements too early can remove useful inventory before the system has a fair test.
When Manual Placement Control Makes Sense
Manual placements are not a failure. They are a control tool. Use them when the creative, offer, or measurement setup makes broad placement automation risky.
Manual control can make sense when:
- The campaign is built only for Reels or Stories and the video has no feed-safe version.
- The product requires detailed explanation that performs poorly in short vertical placements.
- Audience Network or another placement drives cheap clicks but weak sessions, low add-to-cart quality, or suspicious conversion behavior.
- Brand-safety rules require avoiding certain inventory.
- You are running a clean creative test and need to isolate feed versus Reels versus Stories.
- The account has too little conversion data and the algorithm keeps optimizing to low-quality upper-funnel actions.
Do not turn off a placement just because CPM is high. High CPM can still be profitable if conversion quality is strong. Likewise, do not keep a placement just because CPC is low. Low CPC can hide poor purchase intent.
Ecommerce Placement Diagnostics
The most useful reporting view is not only cost per result. Ecommerce teams should read placement performance through the full path from impression to order quality.
| Metric | What it tells you | Placement interpretation |
|---|---|---|
| Thumb-stop rate or 3-second view rate | Whether the creative earns attention | Useful for Reels, Stories, and cold discovery |
| Hold rate or video quartiles | Whether the product argument is clear enough | Weak hold may mean slow opening or poor framing |
| CTR | Whether the ad creates enough intent to leave Meta | High CTR with poor sessions may indicate click quality issues |
| Landing page view rate | Whether clicks become usable visits | Low rate can signal accidental clicks or slow page load |
| Add-to-cart rate | Whether the traffic understands the product | Low rate after good CTR suggests creative-to-page mismatch |
| Purchase conversion rate | Whether the placement finds buyers | Compare against spend and order quality, not clicks alone |
| AOV and refund rate | Whether placement traffic is commercially useful | Cheap placements can still be bad if order quality is weak |
| Comment quality | Whether viewers understand the offer | Confused questions reveal missing product context |
The goal is not to find the cheapest placement. The goal is to find the placement and creative combination that produces profitable buyers.
A Practical Workflow for Testing Meta Advantage+ Placements
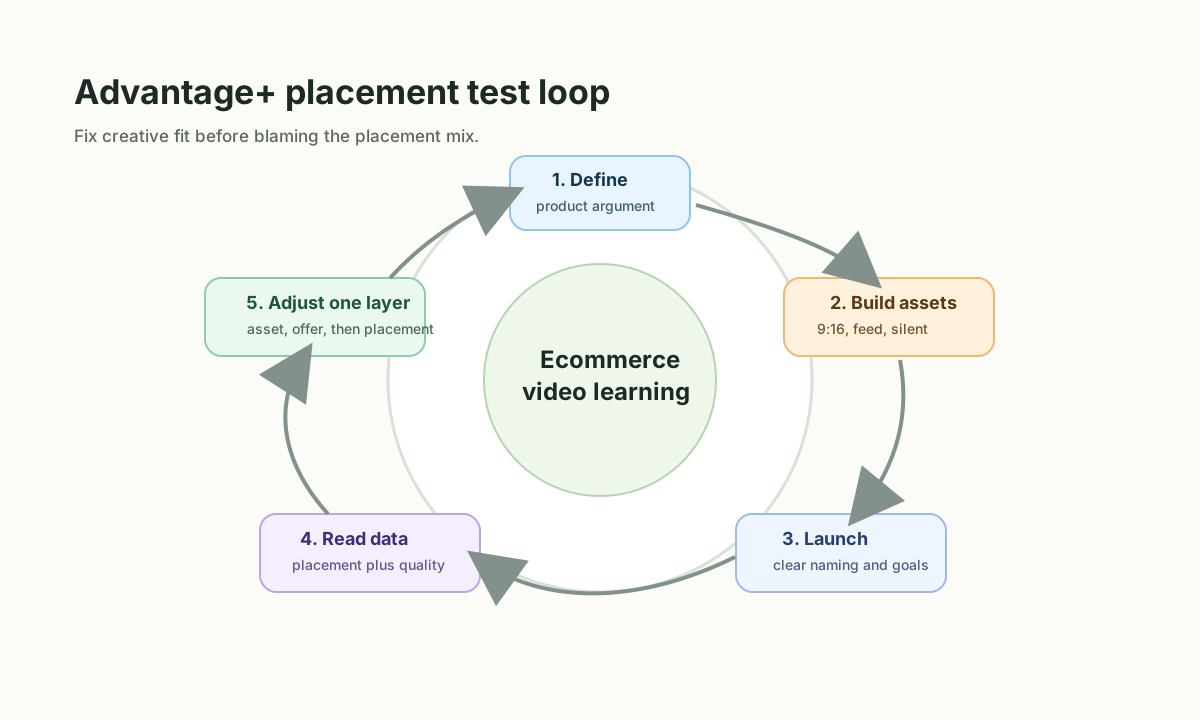
Step 1: Define the Product Argument
Before you open Ads Manager, decide what the video must prove. For ecommerce, common arguments include:
- The product solves a visible problem.
- The product is easier, faster, cleaner, safer, or more convenient than an alternative.
- The price is justified by a specific feature or bundle.
- The product fits a specific use case, size, style, ingredient preference, or routine.
- The offer is timely and credible.
If the product argument is vague, placement optimization will only distribute vague creative faster.
Step 2: Build the Placement Asset Family
Create three cuts from one concept:
| Asset | Ratio | Length | Main use | Required check |
|---|---|---|---|---|
| Vertical discovery | 9:16 | 10-35 seconds | Reels and Stories | Product and hook visible inside safe zone |
| Feed proof | 4:5 or 1:1 | 15-45 seconds | Feed and retargeting | Text readable on mobile feed |
| Silent proof | 1:1, 4:5, or 9:16 | 8-25 seconds | Muted or shopping-adjacent placements | Product claim understandable without sound |
You can create these manually, from creator footage, or from a product page plus still images. The important part is that each asset has a placement job, not just a different crop.
Step 3: Launch With Clear Naming
Use ad names that identify the concept, asset ratio, hook, offer, and audience stage. Example:
SKU123_demo_hook-zipper-proof_9x16_reels-stories_prospecting
This makes placement reporting useful later. If every ad is called "Video 1," the team cannot learn which hook, format, or placement created the result.
Step 4: Read Placement Breakdowns After Enough Data
Review results by platform and placement after the campaign has enough spend and conversions to avoid random conclusions. Look for patterns:
- Reels gets high watch time but low add-to-cart: the hook may be entertaining but product intent is weak.
- Feed gets lower CTR but higher purchase rate: the creative may be less flashy but more qualified.
- Stories gets good CTR but low landing page views: the CTA may cause accidental taps or the page may load too slowly.
- Audience Network gets cheap traffic but weak session quality: consider exclusion or stronger conversion filtering.
- Retargeting feed performs well: move objection-handling and comparison assets there.
The best decision is often not "turn placement off." It may be "give that placement a better asset."
Step 5: Change One Layer at a Time
When performance is weak, separate creative problems from placement problems. Change one layer at a time:
- First fix the asset: crop, safe zone, opening, product visibility, CTA, or captions.
- Then fix the offer or landing page if clicks do not convert.
- Then restrict placements if quality remains weak after the asset is appropriate.
This prevents a common mistake: blaming Advantage+ placements when the real issue is a video that never made the product clear.
Creative Rules for Reels, Stories, and Feed
Keep the Product Visible Early
For ecommerce video ads, the product should appear before the viewer has to infer the brand. A creator face can help, but the product still needs to enter the frame early. In Reels and Stories, show the product, result, or problem in the first three seconds.
Respect Safe Zones
Put key text, product labels, price logic, and CTA cues away from the top and bottom UI areas. If the viewer cannot read the offer because buttons or captions cover it, placement automation cannot rescue the ad.
Avoid One Universal Caption Track
Caption placement that works in feed may break in Reels. Build captions into each placement cut. Use fewer words per frame, larger type, and product-specific language.
Make the Offer Clear Without Overloading the Video
If the ad is for a bundle, show the bundle. If it is for a product feature, show the feature. If it is for a discount, show the product before the discount. Ecommerce ads fail when the viewer remembers the sale but not the product.
Build for Muted and Sound-On Use
Reels and Stories can benefit from audio, but muted autoplay still exists across many contexts. The video should work twice: with sound for emotion and without sound for comprehension.
Example Testing Plan for One Ecommerce SKU
Assume the product is a leak-resistant travel toiletry pouch. The brand wants Meta to find buyers across placements but does not want cheap accidental clicks.
| Test cell | Hook | Asset ratio | Primary placement fit | Success signal |
|---|---|---|---|---|
| A | "Your shampoo leaked again?" | 9:16 | Reels and Stories | Thumb-stop rate and add-to-cart quality |
| B | "Pack skincare without a plastic bag" | 4:5 | Feed | CTR and purchase conversion |
| C | Side-by-side leak test | 1:1 | Feed and retargeting | Add-to-cart rate |
| D | What fits inside the pouch | 9:16 | Stories and Reels | Landing page views and comments |
| E | Bundle offer for two sizes | 4:5 | Feed and retargeting | Revenue per visitor |
| F | Silent close-up proof | 1:1 | Shopping-adjacent surfaces | Purchase rate and low refund risk |
This setup lets Advantage+ placements work with format diversity. It also lets the team see whether performance comes from the hook, placement, ratio, or offer.
How to Decide Whether to Exclude a Placement
Use a decision threshold instead of arguing from anecdotes. A placement should be reviewed for exclusion when it repeatedly shows:
- Spend share is high but purchase share is low.
- CTR is high but landing page view rate is poor.
- Add-to-cart rate is far below account average.
- Post-click behavior suggests accidental or low-intent traffic.
- Comments show confusion about the product or offer.
- The placement requires a creative format you cannot produce well.
- Brand-safety risk outweighs reach.
Before excluding, ask whether the placement received a suitable asset. A 9:16 Reels video judged in feed is not a fair test. A 1:1 feed video judged in Stories is not a fair test. If the placement had a proper cut and still produced weak business results, then exclusion is a reasonable optimization.
Common Mistakes
Mistake 1: Uploading Only One Crop
One crop forces Meta to adapt the asset in ways the buyer may not understand. The result can be cut-off captions, tiny products, and weak CTA visibility.
Mistake 2: Judging by CPC Alone
CPC is not ecommerce profit. A placement that produces cheap clicks but poor product understanding can damage the learning signal and waste retargeting budget.
Mistake 3: Turning Off Placements Before Fixing Creative
If the product is not visible, the hook is vague, or the offer is unclear, manual placement will not fix the ad. Improve the asset first.
Mistake 4: Ignoring Warm Audience Jobs
Cold Reels hooks and retargeting objection-handling videos should not be identical. Warm viewers often need comparison, proof, sizing, shipping, warranty, or bundle clarity.
Mistake 5: Treating Advantage+ as a Strategy
Advantage+ placements is a delivery setting. It is not a product argument, creative testing system, or merchandising plan. The brand still needs to decide what the video should prove.
FAQ
Should ecommerce brands use Meta Advantage+ placements?
Yes, if they have clean conversion tracking, a broad enough audience, and multiple placement-ready creative assets. If the brand has only one video or weak tracking, manual placements may be safer until the asset library and signal quality improve.
Is 9:16 enough for Meta video ads?
No. A 9:16 video is important for Reels and Stories, but feed placements often need 4:5 or 1:1 assets. A complete ecommerce test usually includes vertical, feed-safe, and silent-friendly cuts.
When should I turn off Audience Network?
Review it when it drives high spend or cheap clicks without matching landing page views, add-to-cart quality, purchase rate, or order quality. Do not exclude it solely because advertisers dislike it in general; use your own placement breakdown and post-click data.
How long should Meta placement tests run?
Run long enough to gather meaningful conversion and post-click data. For small budgets, that may mean reviewing directional signals such as landing page views and add-to-cart quality first, then waiting for purchases before making permanent exclusions.
What is the best first video for Advantage+ placements?
Start with a product-in-use demo that can be cut into 9:16, 4:5 or 1:1, and silent-friendly versions. A clear demo usually adapts better across placements than a purely aesthetic brand video.
Sources Checked
- Meta for Business, Advantage+ Shopping campaigns and automated delivery across Meta platforms: https://www.facebook.com/business/ads/meta-advantage/advantage-plus-shopping-ads
- Meta for Business, Facebook and Instagram Reels ads guidance: https://www.facebook.com/business/ads/facebook-instagram-reels-ads
- Instagram Help Center, reel size and aspect ratios: https://www.facebook.com/help/1038071743007909
- Meta Ads Guide, video placement specs and recommendations: https://www.facebook.com/business/ads-guide/video/facebook-feed/video-views
- Current SERP review for "Meta Advantage+ placements ecommerce video ads" and "Meta ads video aspect ratio" on May 29, 2026.
Next Step
If you are building the creative set now, create one product-in-use concept, then export three cuts before launch: 9:16 vertical discovery, 4:5 or 1:1 feed proof, and a silent-friendly product proof version. Pair this with dynamic creative optimization for ecommerce video ads when you are ready to test hooks, offers, and proof angles systematically.