
Quick Answer
Product video compression should start with the final placement, not with a random file-size target. Choose the aspect ratio, resolution, and platform upload limit first. Then export from the clean master file as H.264 MP4 unless the placement requires something else, set bitrate intentionally, and inspect the product details that affect buyer trust.
For ecommerce ads, the goal is not the smallest possible file. The goal is a file that uploads cleanly, loads quickly, keeps captions readable, preserves product texture, and does not distort the proof a buyer needs before clicking. If compression makes the product look cheaper, hides a label, blurs a comparison, or knocks captions out of sync, the export is not ready.
If you are still deciding target dimensions, start with the product video aspect ratio guide and product video resolution guide. If the file is already too large, use this page with the product video file size guide and bitrate guide.
Why Product Video Compression Is Different From Generic Video Compression
Most compression advice is written for creators, livestreamers, or long-form video uploads. Ecommerce product videos have a different risk profile.
A product ad often depends on small visual details:
- The texture of fabric, leather, ceramic, or food.
- The finish on a watch, bottle, bag, or appliance.
- A before-and-after comparison.
- A review quote or claim disclaimer.
- A price, size, or offer overlay.
- A close-up demonstration of how the product works.
- A package, ingredient label, or compatibility screen.
Generic compression can hide those details. A travel bottle may look scratched. A makeup shade may shift. A supplement label may become unreadable. A screen-recorded app demo may look soft. The file still "works," but the buyer gets less proof.
That is why ecommerce teams should treat compression as a QA step, not a last-minute export setting.
Start With the Placement Before You Compress
Before you touch bitrate or file size, decide where the video will run. TikTok, YouTube, Reels, feed placements, PDP media blocks, and retargeting campaigns do not use the same viewing context.
Google's YouTube ad spec guidance recommends Full HD options such as 1920 x 1080 for horizontal, 1080 x 1920 for vertical, and 1080 x 1080 for square video, with 16:9, 9:16, and 1:1 as the main aspect ratios. TikTok's June 2026 In-Feed Ads specs list vertical 9:16 at at least 540 x 960, horizontal 16:9 at at least 960 x 540, square 1:1 at at least 640 x 640, and file size up to 500 MB for Non-Spark Ads.
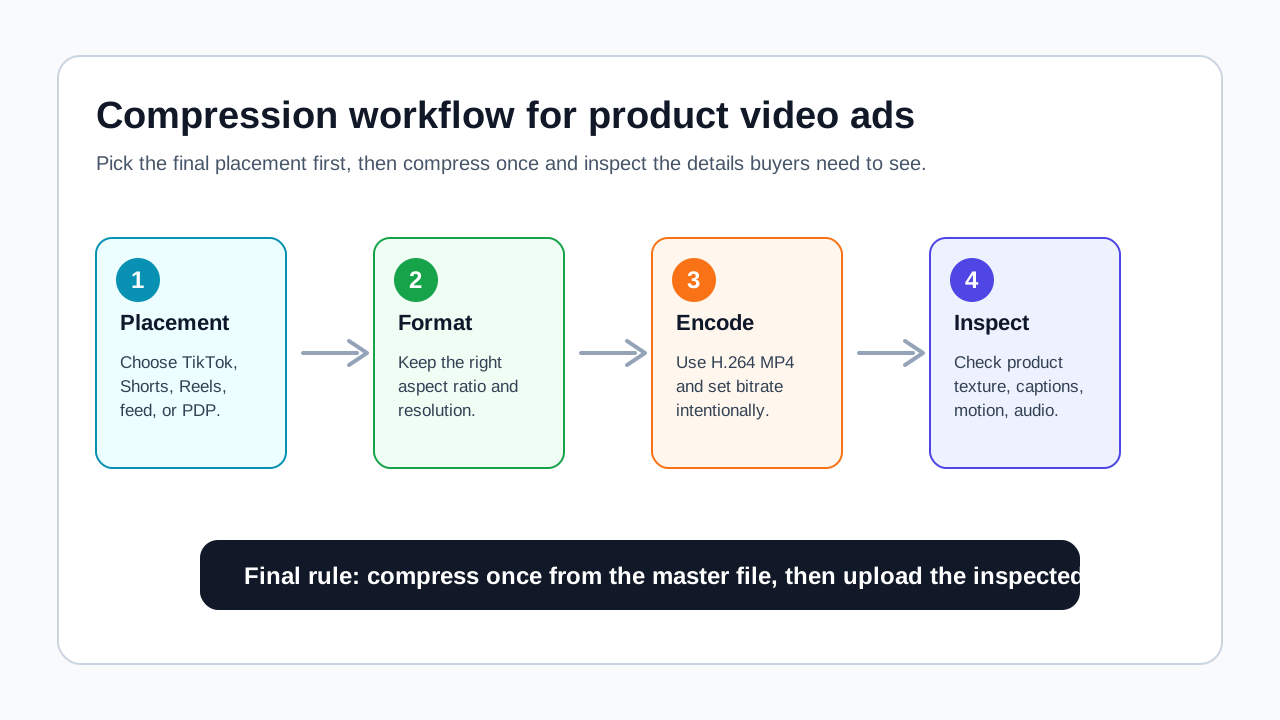
Those limits are not creative recommendations by themselves. They are the boundary conditions. The practical workflow is:
- Choose the final placement.
- Export the correct aspect ratio.
- Keep enough resolution for the viewing context.
- Compress from the master file once.
- Inspect product proof after export.
Do not export a horizontal file, compress it, crop it vertical, and compress it again. Each pass can add visible damage, especially around captions, product edges, and high-motion scenes.
Product Video Compression Decision Table
Use this table before exporting:
| Situation | Better compression choice | Why |
|---|---|---|
| TikTok or Reels product ad | 9:16 MP4, inspect captions and UI-safe areas | Vertical viewing is the native context |
| YouTube Shorts ad | 9:16 Full HD when possible | Shorts are vertical and text-heavy |
| Feed retargeting ad | 1:1 or 4:5 if the placement supports it | More product area than 16:9 on mobile feed |
| Product detail page video | Use the PDP display size as the target | Oversized files slow the page without adding visible quality |
| High-motion demo | Use a higher bitrate than a static beauty shot | Motion creates compression artifacts faster |
| Text-heavy proof video | Preserve resolution and caption sharpness | Blurry proof lowers trust |
| Large master file from editing software | Export a clean delivery copy once | Re-compressing compressed files compounds quality loss |
The key is to avoid a single "best setting" for every SKU. A jewelry close-up, a blender demo, a clothing try-on, and a screen-recorded app demo need different tolerance levels.
A Practical Compression Workflow
1. Keep a clean master file
Always keep the highest-quality edit as the source of truth. That file can be large. It is not the upload file. It is the version you return to when making a TikTok crop, a Shorts crop, a PDP version, or a retargeting cut.
The mistake is exporting one compressed ad, then using that file as the source for the next placement. That creates generation loss. Caption edges get rougher, gradients band, product movement blocks up, and skin tones or material colors can shift.
2. Choose one delivery file per placement
If you need TikTok, YouTube Shorts, and a product page video, export each from the master file. Do not make one file serve every context unless the placement requirements really match.
For example:
| Placement | Delivery file | Compression priority |
|---|---|---|
| TikTok In-Feed | 9:16 MP4 | Native vertical framing, readable captions |
| YouTube Shorts | 9:16 MP4 | Safe-zone text, clean first frame |
| Meta/Reels-style vertical | 9:16 MP4 | Caption clarity and fast opening |
| PDP module | Size matched to page layout | Fast load and accurate product detail |
| Email or landing page embed | Shorter compressed preview | Speed over maximum fidelity |
If a single master concept has to support several placements, plan this during the edit. Put product proof and captions where they can survive crop and compression.
3. Set bitrate based on motion and detail
Bitrate controls how much data the file can use per second. Too low, and the video gets blocky, blurry, or noisy. Too high, and the file may be heavier than needed.
For ecommerce product videos, raise quality when the ad includes:
- Fast hand movement.
- Pouring, spraying, steam, powder, water, or hair movement.
- Detailed fabric or reflective surfaces.
- On-screen product labels.
- Dense captions or price overlays.
- Screen recordings with small UI text.
Lower bitrate may be acceptable when the ad is mostly static:
- A single product hero shot.
- Slow rotation.
- Minimal text.
- Low-motion voiceover or presenter segment.
- Simple background with few details.
For more on choosing a target, use the product video bitrate guide.
4. Avoid repeated compression loops
Compression damage is cumulative. If a designer downloads a compressed preview, adds a logo, exports again, sends it to another tool, and compresses again, the final file may look much worse than the first export.
Use this operating rule:
Edit from the master, export the delivery file, inspect once, then upload.
If the inspected file fails, go back to the master or editing project. Do not keep adjusting the already-compressed file unless the change is purely a container-level fix.
5. Inspect the compressed export at phone size
Desktop playback can hide mobile problems. Check the compressed file on a phone or in a phone-sized preview. Look at the first frame, product close-ups, captions, logo, CTA, price, review text, and audio sync.
This is especially important for product ads because buyers often decide in the first second whether the item looks credible.
What to Check After Compression
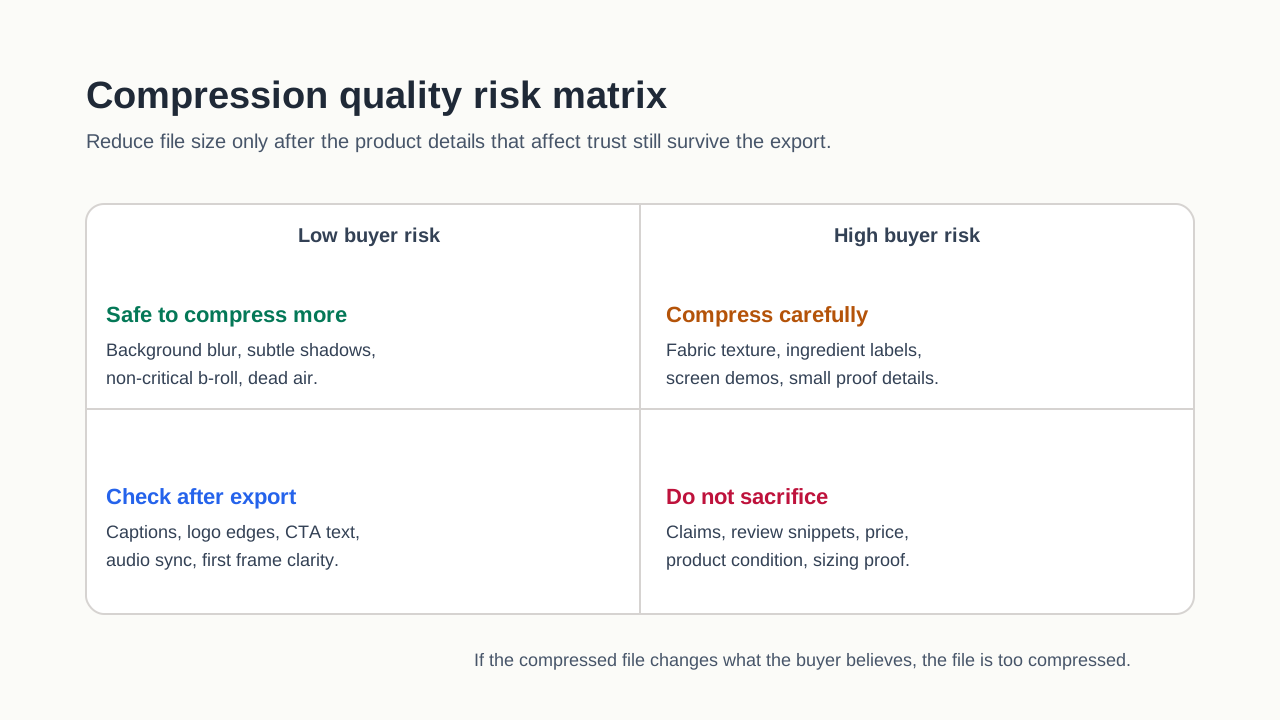
Use this QA table before upload:
| Check | Pass condition | Common compression failure |
|---|---|---|
| First frame | Product or problem is clear immediately | First frame looks soft or muddy |
| Product texture | Material, color, and finish remain believable | Fabric, food, skin, or reflective detail smears |
| Captions | Text is readable without pausing | Thin letters break or shimmer |
| Price and offer | Numbers and discount terms are legible | Small type becomes fuzzy |
| Reviews or claims | Proof text can be read and still matches the source | Review screenshot is too compressed |
| Motion | Demo movement stays smooth enough to understand | Blocks appear around hands or product edges |
| Audio sync | Voice, captions, and product action align | Re-encoding creates timing drift |
| Safe zones | UI overlays do not cover key text | Compression/crop workflow moved text into unsafe areas |
| File size | Upload target is comfortably under platform limits | File is technically valid but slow to handle |
If captions are a recurring issue, pair this page with the product video captions QA guide.
Compression Problems and Fixes
The product looks blurry
Start by checking whether the source file was already low resolution. Compression cannot restore detail that the master file did not have. If the master is clean, the bitrate may be too low, the export resolution may be too small, or the platform crop may be enlarging the video.
Fix:
- Export from the master file.
- Match the correct placement resolution.
- Increase bitrate.
- Avoid scaling a small video into a larger canvas.
- Use simpler backgrounds behind detailed products.
Captions look jagged or hard to read
Caption edges suffer quickly when the video is compressed too hard, especially with thin fonts, low contrast, animated text, or small type.
Fix:
- Use larger caption text.
- Increase contrast.
- Avoid very thin font weights.
- Keep captions inside safe areas.
- Raise bitrate when captions are dense.
- Inspect on a phone-sized preview.
Color or texture changes after export
Compression can make product colors look dull or uneven. This matters for apparel, cosmetics, food, jewelry, home decor, and anything where buyer expectations depend on visual accuracy.
Fix:
- Compare the compressed export against the master.
- Avoid aggressive filters before compression.
- Keep lighting consistent.
- Use enough bitrate for close-ups.
- Do not publish if the product shade looks materially different.
Upload fails even though the video looks fine
The video may use a supported-looking file extension with unsupported encoding, a file size above the limit, an unusual frame rate, or a format mismatch.
Fix:
- Re-export as MP4 with H.264 where accepted.
- Check platform file size limits.
- Avoid obscure codecs unless the platform explicitly supports them.
- Confirm aspect ratio and minimum resolution.
- Upload a short test file if the platform preview is unreliable.
The file is still too large
Do not immediately crush the bitrate. First remove wasted duration, unused intro/outro frames, duplicated scenes, or oversized resolution.
Fix in this order:
- Trim dead seconds.
- Export only the placement size you need.
- Reduce excessive bitrate.
- Simplify high-motion backgrounds.
- Create a shorter cut for paid social.
- Keep the heavier version only for placements that need it.
Platform-Oriented Compression Notes
| Platform context | Compression implication |
|---|---|
| TikTok In-Feed Ads | TikTok accepts several video formats and lists 500 MB as the Non-Spark Ads file-size ceiling, but vertical framing and safe-zone inspection matter more than using the whole limit. |
| YouTube and Google video ads | Google recommends Full HD assets for horizontal, vertical, and square formats and supports very large files, but over-large delivery files do not automatically improve mobile ad quality. |
| YouTube organic uploads | YouTube publishes recommended upload bitrates by resolution and frame rate; use those tables as a ceiling guide, then inspect the ecommerce proof details. |
| Meta placements | The public Ads Guide was checked but redirected to login/temporary block during this run, so verify current specs inside Ads Manager before upload. |
| Product detail pages | Page speed and buyer inspection matter; avoid uploading a giant ad-master file when the page displays a smaller embedded video. |
This article intentionally avoids giving one universal compression preset. Platform specs change, and product videos differ too much. A product-demo screen recording and a lifestyle clip with fast movement should not share the same quality target.
How Compression Fits Into the Product Video Workflow
Compression should not be the first creative decision. The production workflow should look like this:
- Define the buyer problem.
- Write the hook, proof, and CTA.
- Create or edit the product video.
- Export placement-specific versions.
- Compress once from the master file.
- Inspect product proof and captions.
- Upload and preview in the ad platform or page.
- Log the export settings for future variants.
If you still need the creative asset, start with ShopShot's AI video generator. If the video exists but the export is inconsistent, use the product video export settings guide before compressing.
Compression QA Checklist
Before publishing, confirm:
- The final placement is known.
- The aspect ratio matches the placement.
- The resolution is not smaller than the practical display size.
- The file is exported from the master, not a compressed preview.
- The codec and container are accepted by the target platform.
- File size is under the upload limit with room to spare.
- Captions and offer text are readable on mobile.
- Product texture, label, size, color, and proof details survive.
- Audio is still synced.
- The first frame is clear.
- Safe-zone overlays do not cover the product or CTA.
- The export settings are logged for the next creative batch.
A Simple Naming System for Compressed Product Videos
Use a filename that tells the team what the file is:
SKU_Placement_Ratio_Length_Quality_Date
Example:
TravelBottle_TikTok_9x16_22s_H264_2026-07.mp4
Avoid names like final-final-small-new.mp4. Bad naming causes teams to upload the wrong compression pass or reuse the wrong file for a new placement.
FAQ
What is product video compression?
Product video compression reduces the file size of a product video by encoding it more efficiently. For ecommerce ads, compression must preserve buyer-critical details such as product texture, captions, labels, proof, price, and CTA text.
What format should I use for compressed ecommerce video ads?
MP4 with H.264 is usually the safest delivery choice for paid-social and ecommerce workflows, but always check the current requirements for the exact placement before upload.
How small should a product video file be?
Small enough to upload, load, and preview reliably, but not so small that product proof becomes blurry. Start with the platform limit, placement size, duration, motion level, and buyer-detail requirements.
Should I compress a video more than once?
Avoid it. Keep a clean master file and create each delivery export from that master. Re-compressing already-compressed files can damage captions, product edges, color, and motion.
Why does my compressed ad look worse after upload?
The platform may re-encode your upload. Give it a clean, correctly sized file with enough bitrate and readable text. If the source export is already damaged, platform processing usually makes the problem more visible.
Sources Checked
- Google Ads Help: About video ad specs
- Google Ads Help: Video ads specs and format requirements
- YouTube Help: Recommended upload encoding settings
- TikTok Ads Manager: TikTok Auction In-Feed Ads
Meta's public Ads Guide was checked during this run, but it redirected to login/temporary block, so this article does not rely on it as a primary cited source. Verify Meta placement-specific specs inside Ads Manager before uploading final creative.